Programming Failures

          Well, before continuing I would like to make one thing clear: my app is still not finished. It is not finished because I have not been trying or because I have been lazy. It isn't finished because Objective C is much harder than I thought. So, for this final post, I have decided to dedicate it to my failures in programming this app.

          Failure #1: Underestimating the language. Objective C is a language that bears very little resemblance to my prior programming experience. I have programmed in mostly C, C++, and Java though not being at the highest level in the languages. As it turns out, Objective C requires a very high level of C understanding. Though I lacked the high level of C understanding, it didn't stop me from still trying Objective C. I actually was able to kind of program and get some of the features working while others were still pretty hard to achieve. Nevertheless, I gave Objective C, my full effort and even though my app is still under development, it actually has some working functions.

                                        
                 The number of files I worked with in Objective C                         The number of files I work with normally with C++


          Failure #2: Allocating programming time. In my first post, I described designing the app to be the most difficult part of the app creation process and said that programming would be the easiest part. Boy was I wrong. The design of the app, though it was the more creative part, took significantly less time than the programming of the app. The design I created look really simple and polished, but programming it was a huge hassle. Starting with the homework aspect in my programming endeavor, I realized that even the simplest part of the programming was extremely difficult due to all the different parts and that it would take a while. Honestly speaking, I spent all the programming time that I had allocated (like the 4 weeks) trying to get the homework aspect to work, unfortunately, failing each time. If I had maybe given myself more time in programming, and less in design, could I have actually finished at least the homework element. 


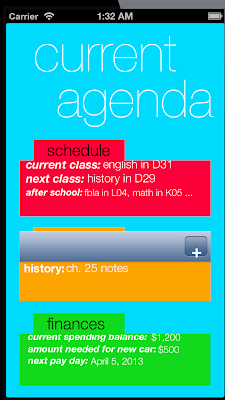
        What my app was supposed to look like                                     What it currently looks like (still trying to get it to work)

          Failure #3: Idea complexity. When starting to think of an idea to make into reality for this project, I thought up a project that was extremely complex and that many programmers that actually do this for a living find mediocre. Knowing that this was my first app I would be making, I should not have thought of such a complex idea and I should have started easy and built up to having different features. I think I chose this mainly as a challenge, but I should have realized that it would be better to stay in my range. 


          Overall, even though I had a few failures, I am not going to say that I totally messed up. It is not that my app functions did not take place, but it was that I was not able to display my different functions to the user in the GUI. Many of the aspects that I had tried to display worked, but the only issue was making them sensitive to the users touch on the iPhone. Even though I am at a small setback, I will still continue to build this app successfully!


Programming is Progressing...

          From last week, my programming struggles have drastically decreased. Given that I am still struggling as this is still pretty hard, I have gotten to point where I can solve some of the problems that I am having with the code. More importantly, I was able to solve the error I was having last week, which actually took a ton of research, video tutorials, and long nights of staring at code. The worst part about all this, was that my error, in essence, took about ten minutes to fix. The error I was having was with the Storyboarding of my app (if you haven't read my post about Storyboarding, click here to see it). In my Storyboard, I needed to have a Navigation Controller, Master View Controller, and a Detail View Controller to achieve the purpose that I was trying to achieve. The Navigation View Controller was the initial controller of the app, the Master View Controller was the main screen on the app, and the Detail View Controller shows the details of each different element. Last week, when working with my app, I was only working with a View Controller and it couldn't output anything because it needed the other elements to perform its function, and this caused the build to fail each time.

          After solving that problem, I was able to continue building my app, and I actually got somewhere! Though it isn't nearly where I expected to be (I really need to work on my estimation skills), I still am at a point where I can finish this app in the next few weeks (even though the project is due like next week). Currently, I have the main page of the app finished. At this point, the user will be able to enter different assignments, finances, and schedules into the app, though I still need to work on making sure that these different aspects are saved into the database and do not get deleted when the app is closed.

                                                                                                
                                                  The picture of my working app. Yes, that does say "No issues"

          Above, you can see the app in its current stages. Though the design is slightly different from my original one in this post, I will apply the final design touches in the end because they are not contributing to the app functionality. 

          The next step that I am going for is implementing the core data aspect. This is mainly to make sure that everything the user selects is saved into the app for future use, as I mentioned in my post about storyboarding. The core data aspect is hard to implement because I'm not exactly sure where to implement it in the code, so my next goal will be to figure how to do this and create the database for saving this information. 

         From this point, it's almost smooth sailing. I really struggled in planning this project out, and really underestimated this language. But, at the current pace I'm going at, there is a realistic chance I may have a beta version of the app ready to present by next week! 

Different sources that helped me solve my issues:

http://kurrytran.blogspot.com/2011/10/ios-5-storyboard-uitableview-tutorial.html

http://developer.apple.com/library/ios/#documentation/iPhone/Conceptual/SecondiOSAppTutorial/CustomizingMasterView/CustomizingMasterView.html

http://stackoverflow.com/questions/10270664/master-view-controller-detail-view-controller-communication

Why I Chose This Impossible Project (VIDEO BLOG)

Programming Is Harder Than I Thought....


         Well, as of my last post, I was pretty enthusiastic about getting starting with programming for iOS. As it turns out, it is not nearly as easy as I expected, even after watching tons of video tutorials from Team Treehouse and after reading hours of Apple Documentation. At this point, I can't even get the App to run after adding my design to Xcode. Usually, my error is either forgetting a semi colon or forgetting to add a variable, in which Ge is the primary source for detecting my errors. In this case, I have no clue with the error is an basically the screen below shows the root of my frustration:


                                                                                        Screenshot of my app trying to run and failing

          The build failed sign is taunting and the fact that I can't get rid of it is even more annoying. So, I decided to consult the experts of programming: the community at Stack Overflow. These people are programming gods and usually can solve most programming problems, so my next was contacting them to help me. I have posted my issue online, but unfortunately, I have yet to hear back. Since I had no response from the Stack Overflow community, I decided to consult the next programming expert, Google. I looked up my error and found a few links that would help. The first link I found was from a guy named Ray Wenderlich who is a iOS programmer and is really good with iOS storyboards (the place in my code I am having trouble with). After reading his link on iOS 5 story boards, I learned a few coding tips to implement in my code that should solve some of the problems that I have been having. Here is some of the code snippets that Mr. Wenderlich provides:

                                                                 
                                                              Code Snippet from Ray Wenderlich

          After looking at the code from Mr. Wenderlich, some of my many build errors went away, though I'm still left with a few to fix on my own. Hopefully I can get a handle on these issues and make sure that I can fix them and complete my app as soon as possible as the due date is quickly approaching. All I know for sure now is that I'm going to be having a busy spring break!


Sources:

http://www.raywenderlich.com/5138/beginning-storyboards-in-ios-5-part-1

http://www.stackoverflow.com

TIME FOR SOME PROGRAMMING!!!!!!!


          Programming is the next, and most time consuming part of the app creation process. This is where my app comes to life and actually works. The programming aspect at this point is fairly mechanical, though difficult for a novice iPhone programmer (myself). So, up until now, all I have been doing is reading Apple's extensive documentation (believe me when I say extensive) to learn the language that iPhones use. This language is called Cocoa Touch and it has a Objective-C framework.  

          Cocoa Touch is an object oriented computer language that is more commonly used to program iPhone apps. It requires a background in C, and a fairly good understanding of computer programming. The IDE (software used for programming) that is required for programming iPhone apps is called Xcode and is provided by Apple, free of charge. Xcode provides a multitude of features including live compiling and app execution without the presence of an actual iPhone. Of course, there will be an iPhone needed to test the app after creation to make sure it is optimized for the user. 

          Before starting on my app, and after reading some Apple documentation, I realized that my app would be using a model-view-controller as its basic framework. The "model" contains the data behind a specific object that can be either created or modified. The "view" is the element that user sees and can interact with. The "view" is able to take in user commands, such as text when the user types or a button response when the user taps a button. The last part, the "controller" comprehends the data from the "view" and transfers it to the model. When the "model" gets the information and changes based on the information, this change is transferred to the "view" with the controller. Below, you can see the different relationships between the model-view-controller. Basically, the "model" gets updated when there is an user action by the controller. The model then notifies the "controller" of the update to the model, and the controller then updates the view based on the model. 


(picture from Apple Documentation
Image of Model-View-Controller to show all of the connections

          The second necessary feature that the Apple documentation revealed was "storyboarding". This feature allows the user to create a visual representation of the apps user interface, with each of the screens and transitions that are part of the app. After the visual representation is created, each element is programmed with its functionality, so that it can work. In the representation there are two main elements, scenes and segues. A scene, as shown in the image below, shows the app a given time. Imagine taking a screenshot of an app on its home screen. Everything in that screenshot would be in the scene portion of the app. In the storyboard, the user creates each scene that is part of the entire app. The second main element of the representation is the segues between the scenes. A segue is basically the transition between scenes that the user sees when clicking on an element. For example, if there is a button that opens up a popup window in the app, the segue would be the popup effect that the app user would see upon clicking the button. By combining the scenes and segues in the storyboard, it allows for the design aspect to be created visually, and then it can be programmed by targeting each of the different elements in the scenes and segues. 


(picture from Apple Documentation)
Shows the different scenes and segues that are used in app creation


          The last and arguably the most important feature that I came across in the Apple documentation was "core data", which is the database that apps use to save information in. In my app, it is important that the when the user enters in a homework assignment, or an after school meeting, the assignment or meeting entered doesn't disappear when the user exits the application. To address this issue, all of the information that an user enters must be stored in a database and the fetched whenever the user opens the app to check for the selected item. This is when core data comes in to play. Core data will save the user data in an XML file, and then the data will be fetched from the XML file to present it to the user. This becomes crucial when managing multiple assignments or after school meetings as it creates a storage hub for these different elements. 

          After learning the purpose and functionality of each feature, the next step I took was learning how these features work in Xcode. To do this I used the video tutorials from Team Treehouse to learn about each and everyone of these features. These tutorials were really helpful and taught me the coding basics behind storyboarding and core data. Check out some of their videos if you would like to see the above concepts in more detail with the programming aspect as well.

          As the learning behind the programming comes to a close, it is finally time to actually start programming the app. See you guys in my next entry!


SOURCES:

- Apple Documentation (the best source for learning about iOS programming and it's included with XCode)

- Team Treehouse (video tutorials for Xcode and iOS programming)

Check Out These Other Blogs


I'm sure that all of you reading my blog are throughly enjoying the content that I provide, but if you guys have time to spare, check these other amazing blogs that I follow and comment on!

Week 2:

1. http://quadroflcopter.blogspot.com (Andrew)

2. http://erbcinematography.blogspot.com (Ethan)

3. http://brycesong.blogspot.com (Bryce)

Week 3:

1. http://jspitt.blogspot.com (Jeremy)

2. http://aslin7weeks.blogspot.com (Alyssa)

3. http://designsbyjennyd.blogspot.com (Jenny)

Week 4:

1. http://brofesttrickshots.blogspot.com (Robbie)

2. http://sundrew.blogspot.com (Drew)

3. http://streetdancein7weeks.blogspot.com (Brianna)

Week 5:

1. http://heylookiwroteabook.blogspot.com (Ally)

2. http://wissahickoncompliments.blogspot.com (Chloe)

3. http://theartofwarsc2.blogspot.com (Sam K.)


Week 6:

1. http://samkesgeniusproject.blogspot.com (Sam Ke.)

2. http://learning-woodworking.blogspot.com (Cool Will Rocks)

3. http://bensepexperience.blogspot.com (Ben K.)

Designing the App: COMPLETE

          Over the course of the past few days, I have successfully completed the first step in my process of creating an iPhone app, which is designing the app. This process, though it seems extremely simple, is the most important part of the app creation process as the user interface as the user experience is fully dependent on it. No matter how much brilliant code is behind the app, the visual appeal is the factor that users want to be absolutely beautiful and perfect. Therefore, the most important step for the success of my app was creating a gorgeous design that would appeal to the users of my app.

          When researching various design tactics to see the preferable layouts of the consumer, I read that the app design has greatly evolved into simplicity. "At first, app design mimicked classic computing inputs like buttons and icons, but developers have recently taken advantage of touch controls by implementing gestures and swipes in their apps to get around." (Kovach 1).  Many apps have even had redesigns to accommodate for this revolution in the app design field.


        (picture from Business Insider)                                                                                                                           (picture from Business Insider)                 Apple Alarm Clock App: Cluttered with different functions                                         Third Party Alarm Clock App: Very simple with basic functions

          In the two app designs above, you can see that the they are both very different as the design on the left has different toggles and options, and the design on the right has two functions: to turn the alarm on, and to turn the alarm off. Regardless of the increased function of the left side design, users prefer the design on the right because it is much simpler to use and has a more attractive design. 

          Still, I needed to know if there was more to design than just simplicity. And there was. I read that some important factors were "usability and typography beautiful color schemes, fine contrast and vibrant colors, ease of use, and clean interfaces" (Mekšs 1). I looked at some other designs to see how these elements were used to enhance the usability of the app. These are the different designs: 


                (picture from 1st Web Designer)                                                                                            (picture from 1st Web Designer)        
                                                    Istid App                                                                                                                                   Jauntly App   


                  (picture from 1st Web Designer)                                                                                          (picture from 1st Web Designer)                                                                           Moodswings App                                                                                                                           ChowNow Tip App


               (picture from 1st Web Designer)                                                                                          (picture from 1st Web Designer)                                 
                                            I Do Lists App                                                                                                                              Quote Roller App

          After looking at over twenty designs, I started to work on my own designs and as of Wednesday, February 27, 2013, I was able to create a design for my app that was not only simple and appealing, but also could carry out all of the functions if programmed correctly. The design I created attempted to follow all of the above protocols of design, while maintaining functionality that I was aiming towards. Here are some pictures of the design I developed:


App Main Screen: Swipe left on each individual category to expand. Settings button on top left.


          This is the main screen design of the app. When the user first opens the app, he/she will be greeted by this page. Here the user will be able to see a minimized schedule pane, homework pane, and finance pane. These panes show the schedule of the student at a given time (current class, next class, and after school activities), the homework assignments of the students in order of day due, and the main financial information of the student. To look at the rest of the schedule, homework, or finance information, the user can just swipe left from the respective pane and it will show an expanded menu. From the main screen, the user will be able to add to their schedule an after school activity, an additional homework assignment, or an additional financial expense by clicking on the "plus" button in the respective pane. To edit the master schedule or maintain any other app settings, there is a gear icon on the top left of the screen to allow the user of the app to do so.


 App Homework Screen: This is the expanded Homework screen


          This is the homework screen of the app from which the user of the app can control their homework assignments. This becomes a virtual "agenda" for the users as they can enter in various homework assignments that are due for the week or later. Each of the assignments can be grouped by the choice of the user, though in this screen shot the assignments are ordered by class. In the homework screen, the user can see assignments based on the day of the week or all the assignments at once depending on the option they pick. If they click on the label corresponding to the day of the week (directly under the "homework" label), then the assignments of the selected day of the week will come up.


 App Schedule Screen: This is the expanded schedule screen

          This is the schedule screen of the app from which the user can see an outline of their day. Here, the user is able to see all of the classes they have on a specific weekday, or if the high school/college runs on a cycle system, it can tell the user the specific class that they have on any specific day of the cycle. This screen also tells the user from what time period that each class is running as well as the respective rooms of each class. Also, the user of the app will get a notification of the specific class they should go to when the class before ends.


 App Finance Screen: This is the expanded finance screen

          This is the finances screen of the app in which the user can control their spending amounts as well as budget their income so that they can make the most of their money. As many high school and college students have jobs, this feature becomes very handy as it ensures that the student does not spend more money than they have in their bank account. In this section, the user is able to put in a monthly salary in which the app will reset each month (on the payday). Whenever the user makes a one time expense (buy lunch), they will have to enter the amount spent in the app. If the user has a recurring payment (apartment rent), then the app will automatically adjust the available balance depending on the frequency of the recurring expense. The finance section will also allow the user to set longterm and short term savings for different future expenses that the user of the app can allocate money to. This will help the user budget their money in a way that they are not only being responsible with their money, but are also getting the items they want.

          Overall, this design section is probably the most important step in advancing in my app. The need for the ideal design becomes a huge factor in the user experience category, so it is a huge step forward in the project to be finished the design aspect. The next step I will be focusing on is the programming aspect, and hopefully, I can have a fully functioning app by the end of this month!

          Stay tuned for my next entry, in which I will be documenting the programming status of my project!


Citations

Kovach, Steve. "The Incredible Evolution Of App Design." Business Insider. Business Insider, 17 Feb. 2013. Web. 28 Feb. 2013.

Mekšs, Daniels. "40 Beautifully Designed Mobile Apps With Excellent UI Experience in Mind." 1stwebdesigner. 1st Web Designer, 27 Feb. 2012. Web. 28 Feb. 2013.


iOS Programming:
App Development
© 2012 | Designed by LogosDatabase.com, in collaboration with Credit Card Machines, Corporate Headquarters and Motivational Quotes